This is a review of one of my replays, done by Dasuke. Text in italics, like this, will be my comments, while the rest are his. The game was played on my alt account. At the time of this replay, my main account was third dan.
Replay link: https://tenhou.net/0/?log=2019062403gm-0089-0000-439014fe&tw=2
I'm giving this the fullest of review I can cognitively manage at this
time of night, and the points I'm mentioning are not all necessarily
things you should be actively working on at the moment, but at least be
aware of.
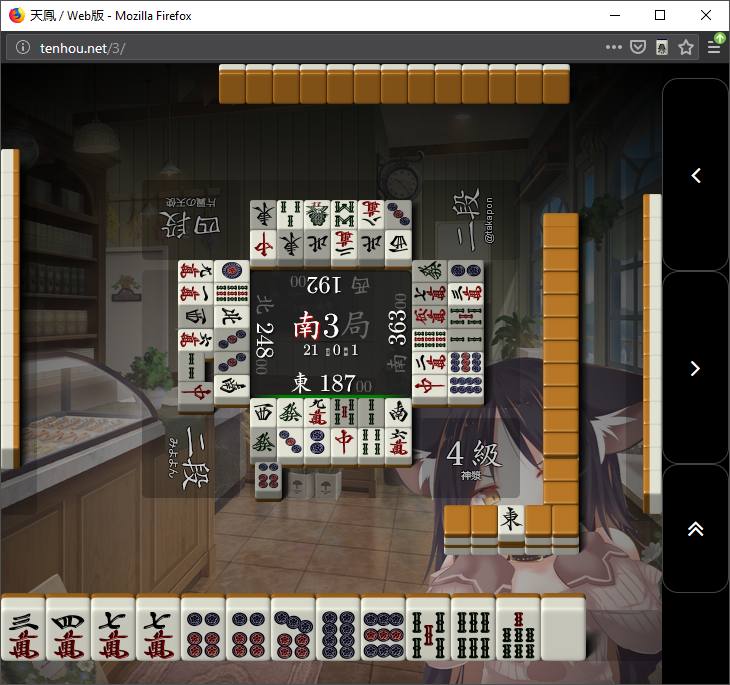
Starting off with a hand with Value (in this case, two dora), go for max
efficiency. Here, a guest wind doesn’t help you much, even less than regular
lone 1/9. In this case the 1p is actually
better than a lone 1/9,
because of the 5p! Look for 135 and 579 chances. Don’t give up any speed
when you have value.
Taatsu over situation. This is a bit interesting here, with a couple of
things you can do depending on the type of game you’re playing. In
something like WRC aka nashi rules, keeping the dora around is pretty
important. But in red 5 mahjong, Speed is KING when you have value. Take
the fastest route here and drop the 3s! If needed later, drop the 6s for
the double sided wait with tanyao and two dora, especially for
riichi. Even the biggest hand is worthless if it doesn’t win. Don’t get
stuck on a bottleneck 4s kanchan!
Another Taatsu choice situation. In Pinzu you have the 556778, in souzu
you have 23+455. Tanyao is a possibility, but given your shapes, pinfu is
also really good. Furthermore, you have a chance to not be reliant on
tiles around the dora to complete your hand (hard to get from others).
PLUS a chance to lock in dora pair as well. Drop the 5s!!!! 569p146s vs
5p1467s!!!
Ahh, I misread the 556778p... I was like, "I don't want iipeikou here, come on."
At a glance the decision to push here is OK from a default EV
perspective, given the value of your hand. That being said, if you look
into this
specific situation a bit deeper, there is another choice you
can find that is better. Remaining suji for South: 6. North: 5. Or, a
nice rule of thumb when pushing two riichi: ANY musuji in the last row
is VERY VERY Dangerous. In this case, even more so because of the tiles
we can't see that can be used with 8m (6m: 4, 7m: 4, 8m: 3: 9m: 2).
Folding (or maybe even a bit adventurous 2s drop) is better here just because of how dangerous 8m is against TWO riichi.
I'm not sure when it'd be "enough" value to push that 8m...
In general that mangan value is okay, but there are certain situations where the rate of deal in is SO HIGH that even a mangan or haneman tenpai might be better off folding than dropping a certain tile.
Confirmed haneman hand. Currently on a 9p tanki with a chance to upgrade
to a 69m. At a glance, this is 3 tiles versus 5 tiles. But is the 69m
ACTUALLY better than the 9p? How many of the tiles you're waiting on are
in the wall? How likely are your opponents to have them in their hand?
How likely are your opponents able to use the tile you're waiting on in
their hand? How likely are they to drop the tile you’re waiting on?
Considering these questions in conjunction with some discard readings,
we can get a glance into another option as opposed to the naive base
tiles remaining in current view.
There are a ton of discard readings, though one of the simplest is
early discards and their relation to tiles in the hand. Often times,
early discards (especially the first few discards) are lone tiles. In
other words, there is a higher chance that that player does not have
tiles surrounding the tile they dropped early on. This would also mean they're less likely to be able to use tiles around it in their hand.
Back to the current board, in this case West discarded 8p on the
first turn, North on the third, and you also dropped a 8p killing off
all but one 8p that could enable the 9p to be used for the 789p shape. Since the 8p
that came out from North and West follows a normal hand progression
convention (14/69 -> Guest winds -> lone 1/9 -> yakuhai ->
2/8 -> 3-7) then there is a good chance they don’t have any tiles
around 8, in other words, no 9.
In comparison the 69m, while they don’t look that bad especially
with the 5m discard from East and West, the 6m is Dora now and is a lot
harder to drop in a situation like this.
Another taatsu choice situation. 355p and 5788s are up on the cutting
block. In this case, because you have a solid 5 blocks already, and GOOD
value, maximizing your speed and killing off your choke points is HUGE
here. As such, rather than dropping the 5p, kill off the hanging 5s and
lock in the 788s (even with the 9s discards). This technically leaves a
little option for 2-shanten to chiitoi as well, though its
painfulll
to take. That being said, on higher tables, you’re not as likely to get a
dora pon later so the chiitoi option is still viable.
I think my taatsu cut choices will be the next thing I really focus on.
Guest wind discard order. Small thing, but the longer you hold a wind, the
more likely it is a person will call Pon it when you drop it. In other
words, drop the winds you want to be called the LEAST first. In a flat
situation this means getting the most out of your drop via Gained
Turns! If Shimocha calls, no one’s turn gets skipped. If toimen calls,
shimocha’s turn gets skipped. If kamicha calls, then BOTH toimen and
shimocha get their turns skipped. As such, for a flat situation with
equivalent guest winds, you can discard them counter clockwise to gain a
smallllll edge. Don’t follow this verbatim, but know the underlying
reason why, then you can more easily change it around based on your specific
situation.
In a situation where you don’t want a certain player to win, but need
to drop the tiles to continue your hand for instance, kill off their
wind because you mess with the other player's winds.
Taatsu choice. A hand only needs ONE pair. In the case of a Complete 1-shanten like this, it's best to lock-in a PAIR to maximize ukeire and guarantee you’ll have a good wait in tenpai. Here, you have a choice
between 405m and 066p. Since confirming the pair for 6p means dropping
the dora, drop 4m here and confirm 05m pair.
I realized that was bad during the game. I guess the game had enough of punishing me at this point, though.
Taatsu and floating tile choice. Currently the hand has these blocks:
55m(1), 4679p(2), 1234s(1), 79s(1), HH(1). Given, then, that you have 6
potential blocks, rather then keeping them all, it's better to keep 5 and
strong floating tiles, specifically when your blocks are not ideal.
Of
the blocks we have, the most obviously strained shape is the 4679p, so
treat this as one block. Our floating tile potentials here are 4p, 9p,
and 4s. 9p is the dora so we wanna keep that. Between 4p and 4s, since
we’re not looking for just ‘blocks’ here, since we have 5 already, but
‘ideal blocks’, chances to upgrade to a good shape are what we want out
of a good floating tile. 4p has 3p and 5p but we can already use 5p in a mentsu with the 67p. 4s can use 3s and 5s to become a ryanmen, though the 5s
puts the 79s upgrade in an interesting situation.
So then, assuming we like
both 3p and 3s upgrades about the same, the question is do we like the
45679p shape or the 1234579s shape better. Bit of a toss up, considering
9p is the dora, but given that if the 45679p gets extended with a 3 or 6
the 9p has to go anyway, plus we can still keep dora chance around for a
good while, the souzu shape is probably preferable (also helps avoid a
forced 8p dora indicator kanchan end shape...).

Your favorite, Taatsu/Floating tile choice! The current blocks in this
hand are 899m(1), 5556p(1/2), 66779s(2). Lone floating tiles: 3m, 3s. We have some value with the dora, and the shapes aren’t ideal here, so we
wanna keep the chance to upgrade them as much as we can. 6p is good
right now, because we can use tiles around it to confirm this 5556 into a
two block shape. 899m is best to keep alive as is right now to raise
the chances this bottleneck will be fixed. Then that leaves the two lone
floats in the souzu shape. With 66779s, a 8s can be used to make a
66+789s. BUT we have a number of pair candidates in the hand already
(99m and the 5556p shape), so rather than 66+789s, two mentsu potential
blocks 67+ 678 is much more preferred. So, all keeping 9s around does for
us is give the bad kanchan shape 779 with a 6s draw. In comparison, the
floating 3m and 3s can take in surrounding tiles for a ryanmen upgrade.
So, drop the 9s!

Taatsu choice. 5556 looks like a nice shape, but only when you can
properly use it. There is an interesting trait about the 5556 and
shapes like it, same with 5557, which is that this shape is not nearly as
good if there are multiple pair candidates in the hand already.
In this hand, you’re 1-shanten with a dora and 5 blocks. With the 6p
drop, bolstering up the uncompleted blocks, you’ll end up with a good
shape with a 5678s and also have the possibility for pinfu and iipeikou
upgrades.
I've been focusing on shapes recently, so I think when I saw the 5556 I
was like "Hey! This is a shape from my anki deck!" and wanted to keep it
because of that, haa. Well, progress in one way first, then work on the
implementation details after...
Dropped in shanten and in blocks by dropping an AMAZING 23p ryanmen
where you can see ALL of the 3p. Don’t get allured by a furiten 4 sided
shape. Even if you want sanshoku, drop 4s here. Don’t fall for tanyao
sickness!!! Especially as last place and DEALER in S-3, speed is of the
essence, and dropping shanten AND the best ryanmen speed wise you could
ask for here is equivalent to giving up the round.
You’re last place dealer in S-3 with a complete 1-shanten hand. While
at this point you don’t wanna risk something SUPER DANGEROUS, you HAVE
to take risk. And in this case, with the primary dora being dead in your
view and only two unseen red fives, you have room to FIGHT. Shonpai
yakuhai is dangerous, but its not super likely to deal in either. You
have a complete 1-shanten getting into tenpin 2/4 turns base, Go for
it!!!
Dealer Double Sided Oikake riichi by itself is already EV positive!!!
Let ALONE in this specific situation where the dora is dead, and you’re
in Last Place in S-3 in DESPERATE need of points. Take this fight!
Hm, so, I should always chase if I'm dealer with a good wait, even with a nomi? Assuming I'm not discarding a dora or something to do so, maybe?
In a flat situation, generally yes. Sometimes you can have some info that shifts it the other way (like you can confirm they got HELLLA value), or a situation where you don't benefit from a direct fight (like a good placement in late game). But, for a flat situation, or especially a down situation where you need to go EV positive, then yeah, fight!!!!
So those "EV positive, but placement EV negative" things you kind of have to do when you're in last? At least, late in the game.
Yep, especially then. First is a position where you got lucky already, last and third is a position where you need to get lucky. So especially, if second or first is nice enough to lower their neck for you, take the chance to cut it off! (the reverse is why you don't wanna do that when you already got it all in life).
wow, that doukou
Taatsu over. Drew 78s, but 9s was discarded earlier and 3 are already
dead in sight. 55s is also in hand, so 6s can still be used. Your other shape is a
ryanmen, and you have a chance for sanshoku. Drop 8s!!!
Nothing to lose if you deal in. Ryuukyoku noten means you’ll drop with the 3.9k diff. FIGHT!
Yeah, still gotta pay more attention to the scores in S4... Thanks for
all the feedback! I appreciate it immensely, and will review it closely
and think of ways to work on it.
o7


No comments:
Post a Comment